Principles of Tooth Preparation: Part-8
Prosthodontist, MIK Dental, Mumbai, India
LOWER INCISOR PREPARATION FOR A MONOLITHIC LIDISI/ZIRCONIA CROWN
Owing to its smaller dimension, preparing a mandibular incisor tooth can often be a challenge. A slight compromise in the amount of tooth reduction would have to be made if a multilayered prosthesis like PFM is planned. Such a preparation is sure to end up in a biologically, mechanically and aesthetically unacceptable prosthesis.
Hence, a monolithic restoration (Lithium disilicate or zirconia) is a better choice for such teeth, as it requires less tooth reduction.
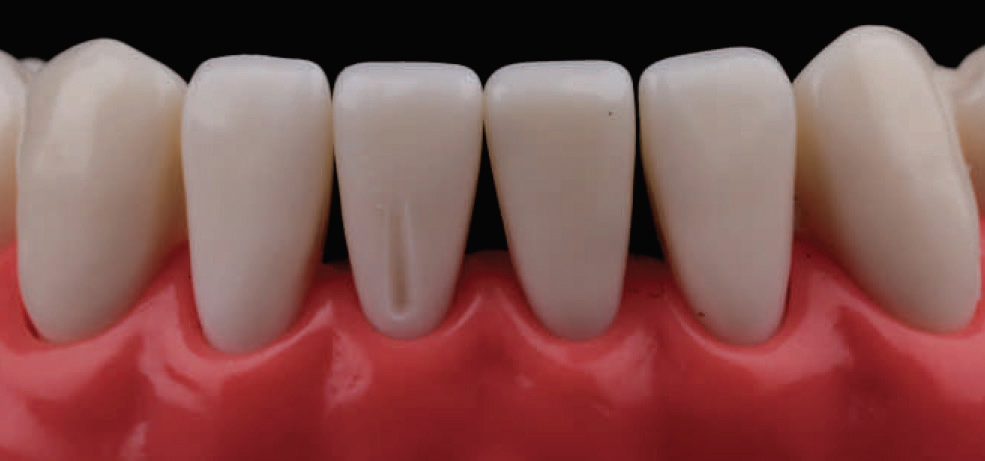
Fig. 4.217: First, a single depth groove is made in the gingival plane, (plane 1), using the DC 1.0 bur which is sunken to half its width.

Fig. 4.218: The same depth groove is then extended onto the incisal plane (plane 2) using the same bur.

Fig. 4.219: Next, the labial surface is reduced along the gingival plane using the same bur.

Fig. 4.220: Following this, the incisal plane is reduced, thereby completing the labial reduction.


Fig. 4.221, 4.222: The proximal surfaces are prepared using the MI 0.5 bur, leaving a thin lip of enamel. Care should be taken to ensure that the margin is kept above the interdental papilla.

Fig. 4.223: The wings are broken using a straight probe. The uneven nature of the margin should not be of concern at this stage, as protecting the adjacent tooth is of utmost priority.

Fig. 4.224: The IR 2.0 bur is then used to scribe a 2 mm groove on the incisal edge.

Fig. 4.225: The IR 2.0 bur is then used to scribe a 2 mm groove on the incisal edge.
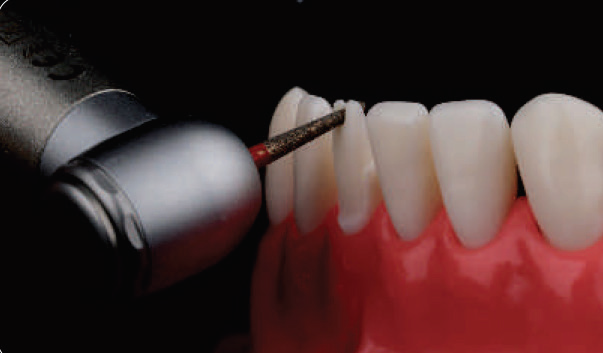
Fig. 4.226: The DC 1.2F bur (Finishing bur offers greater control) is used to reduce the incisal edge. This bur is angled to follow the proposed incisal edge position (as shown) and the edge is reduced.

Fig. 4.227: The DC 1.2F bur (Finishing bur offers greater control) is used to reduce the incisal edge. This bur is angled to follow the proposed incisal edge position (as shown) and the edge is reduced.

Fig. 4.228: Next, the lingual margin is prepared (relatively parallel to the gingival plane of the labial surface) using the DC 1.0 bur which is sunken to half its width.

Fig. 4.229: Lastly, the lingual concavity is reduced using the CR 2.3 bur, ensuring the concave architecture is maintained.

Fig. 4.230: Lastly, the lingual concavity is reduced using the CR 2.3 bur, ensuring the concave architecture is maintained.
The preparation is then finished using the DC 1.2F bur, taking utmost care to avoid damage to the adjacent teeth. Here again, it is best to keep the preparation margin supra-gingival.

Fig. 4.231: Final preparation: Incisal view.

Fig. 4.232: Final preparation: Labial view.

Fig. 4.233: Final preparation: Lingual view.

Fig. 4.234: Final preparation: Lateral view.
PREMOLAR PREPARATION FOR A PFM FACING CROWN
As mentioned earlier, PFM restorations require aggressive reduction of tooth structure. An accepted way of fulfilling aesthetics and function, while still conserving tooth structure is the use of a PFM prosthesis with porcelain (buccal/labial) facing.

Fig. 4.235: Sections (axial and transverse) through a maxillary premolar showing how metal can be used to minimize the amount of tooth reduction required. A: Porcelain restricted to the buccal cusp; B: Porcelain covering proximal and occlusal surfaces, but not extending to the lingual aspect.
Such prostheses require specific alterations to be performed as part of their proximal preparation, where the wider reduction for porcelain meets the shallower reduction for metal. This junction is referred to as ‘wing’, and it helps communicate the proposed position of the porcelain-metal junction with the technician.
If a metal proximal contact is planned, the wing is to be prepared buccal to the contact. Conversely, if a proximal contact is to be fabricated in porcelain, the wing is to be prepared lingual/palatal to the contact. To avoid an undercut, it is important that the wing is made parallel to the bucco-axial reduction.
Advantages of facing prosthesis
- Conserves tooth structure, while providing an aesthetic prosthesis.
- Reduces the risk of porcelain fracture.
- The metal occlusal surface is less abrasive than porcelain.
- The near parallel walls of the wings add to the resistance form of the preparation.

Fig. 4.236: Buccal reduction starts with placement of depth grooves along the gingival and occlusal plane. This is done with the MS 1.0 bur which is sunken to its full depth.

Fig. 4.237: The occluso-buccal view clearly shows the depth grooves as placed in two distinct planes.

Fig. 4.238: Using the same bur, the labial surface is reduced by connecting the depth grooves.

Fig. 4.239: Next, the interproximal contacts are opened out using the MI 0.5 bur.

Fig. 4.240: The lingual margin is then prepared using the DC 1.0 bur.

Fig. 4.241: Occlusal reduction for a premolar requires only one depth groove to be made on each cusp along the cusp ridge (as marked).

Fig. 4.242: For the non-functional cusp reduction, a 1 mm buccal groove is made using the OR 1.2 bur, by sinking it slightly short of full depth.

Fig. 4.243: The bur is then moved downward and outward towards the proximal surfaces on either side, thus reducing the cusp following the pre-existing anatomy.

Fig. 4.244: For reduction of the functional cusp, a groove is made along the palatal cuspal incline using the same bur. However, here the bur is sunken full depth.

Fig. 4.245: The palatal cusp is then reduced anatomically using the same bur. This completes the occlusal preparation.

Fig. 4.246: Next, the functional cusp bevel is placed using the plane 2 incline of the adjacent molar as a guide.

Fig.4.247: Next, the functional cusp bevel is placed using the plane 2 incline of the adjacent molar as a guide.

Fig. 4.248: The proximal wing is prepared during the Finishing stage. First, the buccal aspect of the preparation is Finished using the MS 1.3F bur and extended into the interproximal, up to the desired porcelain extension. Following this, the remainder of the proximal aspect and lingual walls are Finished using the DC 1.2F bur. A wing is thus produced, where the wider shoulder margin meets the shallower deep chamfer margin.

Fig. 4.249: Close up of the Final preparation: Occlusal view. Note, here the mesial (aesthetic) contact is planned in porcelain and the distal contact is planned in metal. Accordingly, the mesial wing is prepared palatal to the proximal contact, while the distal wing is prepared buccal to the future proximal contact.

Fig. 4.250: Close up of the Final preparation: Buccal view. Note, the vertical component of the proximal wing preparation.
NOTE: This article is a direct extract from the book “Clinical Fixed Prosthodontics” by Dr. Moez I. Khakiani. With over 1700 colored illustrations, clustered into 23 chapters that span over 400 pages, this book is the ideal atlas for every clinicians who wishes to improve on their clinical skills and serve their patients with the highest level or oral care. To purchase the same call on +919111212912.
Disclaimer from Guident
The views and opinions expressed in articles published in Guident are solely those of the authors and do not necessarily reflect the views of the editors, the editorial board or the publisher, Ivory India. Guident does not endorse any product, technique or treatment described. Clinical content is intended for qualified dental and medical professionals and is not a substitute for individual clinical judgement. Guident, its editors and the publisher accept no liability for any consequence arising from the use of information published in the journal.
How to cite this article
Dr. Moez I. Khakiani. Principles of Tooth Preparation: Part-8. Guident. 2019 Jul;12(8). Available from: https://ivoryindia.in/articles/prosthodontics/principles-of-tooth-preparation-part-8.html